3D Print Form Study

Using Autodesk Fusion 360, I have been able to create CAD models in different stages. I started out creating an abstract form with subtle curves and parts that stick outward in order to see what overall form these features can create. Although more research will be done in order to identify the exact curves and angles necessary in the final models, I am just playing around right now creating forms with varying angles and multiple positioning options. This form study will help me analyze different shapes so that I can then break them down into a list of features that I can move forward with as I advance on the forms.

The overall goal was to create models on CAD which I could then transfer to the 3D printer in order to create 2-4 inch ABS plastic models. At this point I am focusing on the form of each of the pieces; once I advance further, I will be making larger scaled models to test out the function. These small models allow me to easily see the forms I have created in different positions as I compare and contrast them to one another.

With each printing stage, I have printed one or two small models that share similar characteristics. I made sure to advance on the previous ones each time I made a new set in order to see how it might better my end design.
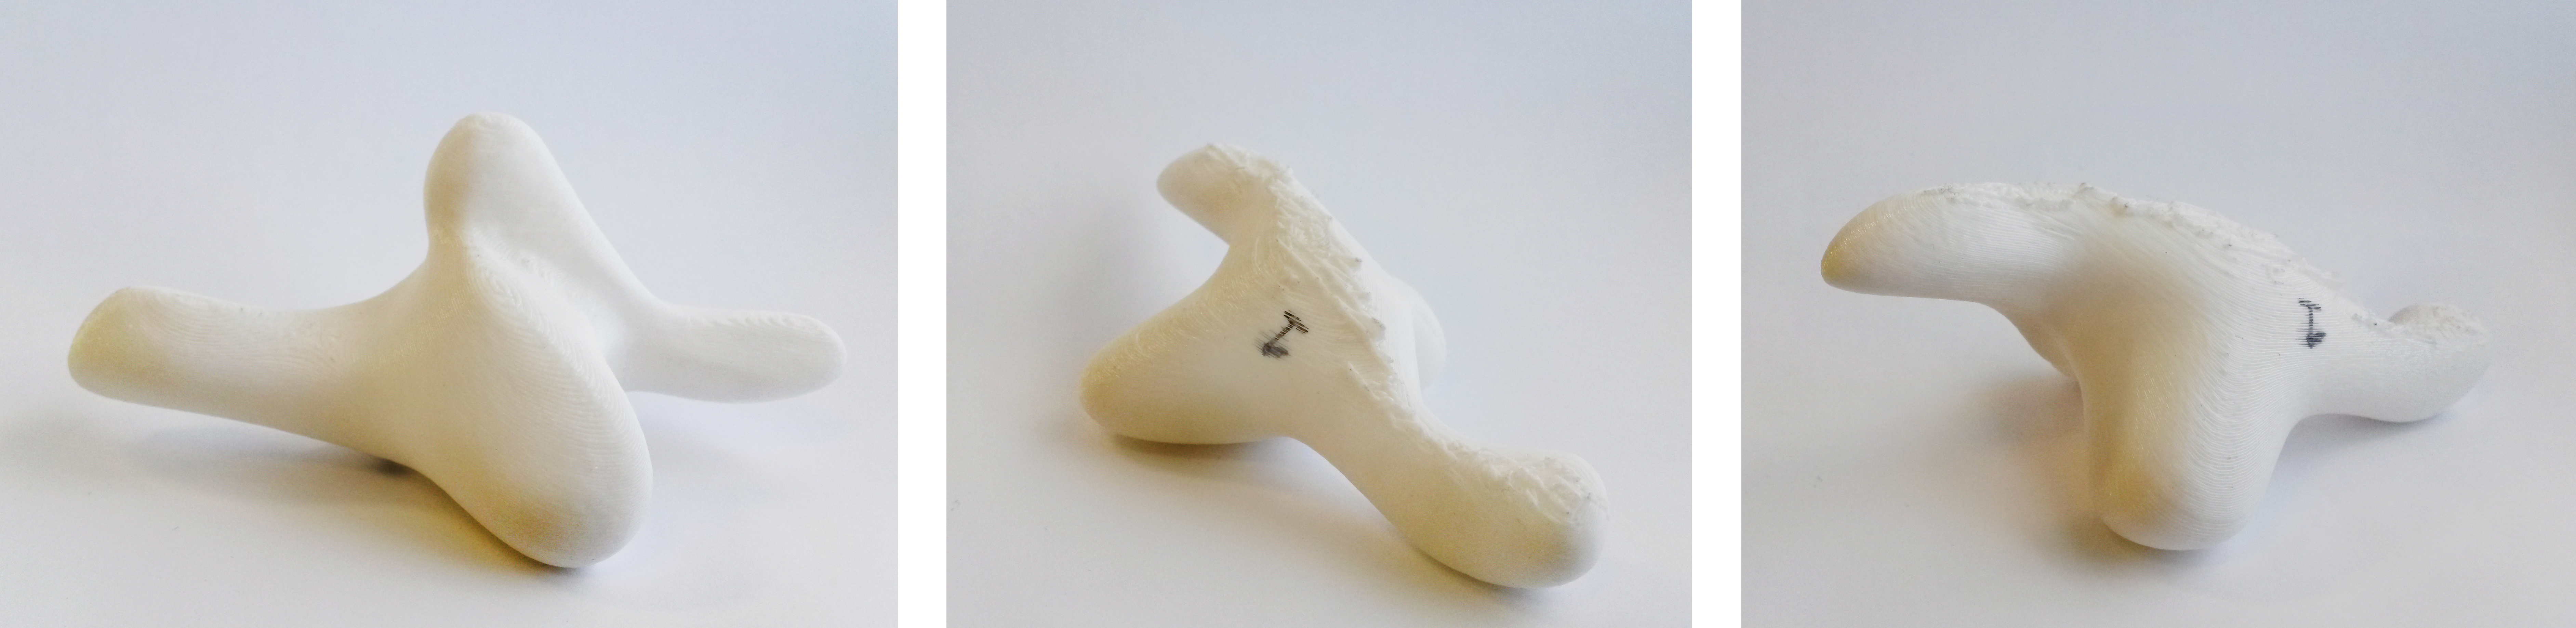
Stage 1:

I created and printed two forms that have a curved surface to initiate a subtle rocking motion on one side, extended areas that the child will be able to lean over and use as support for different activities, high and low points to enable visual tracking, curved areas to use for sitting on, and an overall form that initiates movement. I wanted them to be pieces in which the child is curious to explore by both moving around them and by moving the pieces themselves in order to view different areas. They were created with no definite shape in mind; that ambiguity allows for a more creative mindset when being used by the child. I want to create forms that trigger the imagination in order to increase the fun element in these designs and to make the child more interested in using them.

Another important element I have been focusing on is for the pieces to be able to be placed in multiple positions, both to give each piece a more useful function and to engage the child a little bit more. The design will be created in a way that will allow the child to carefully move it around in different positions without sacrificing the stability necessary to support them when they put their weight on it. Taking advantage of the three-dimensional quality of these pieces will allow me to focus on combining curved surfaces on all sides that can work together for an effective design.

These first two models did not quite support themselves in different positions as well as I had hoped. 3D printing them allowed me see the problems with positioning that are harder to see when designing them on the computer screen. In addition, the parts that stick out on these models are too present. They became more linear than I anticipated and I will continue to work on more simplified forms with subtle curves that still execute the functions required.
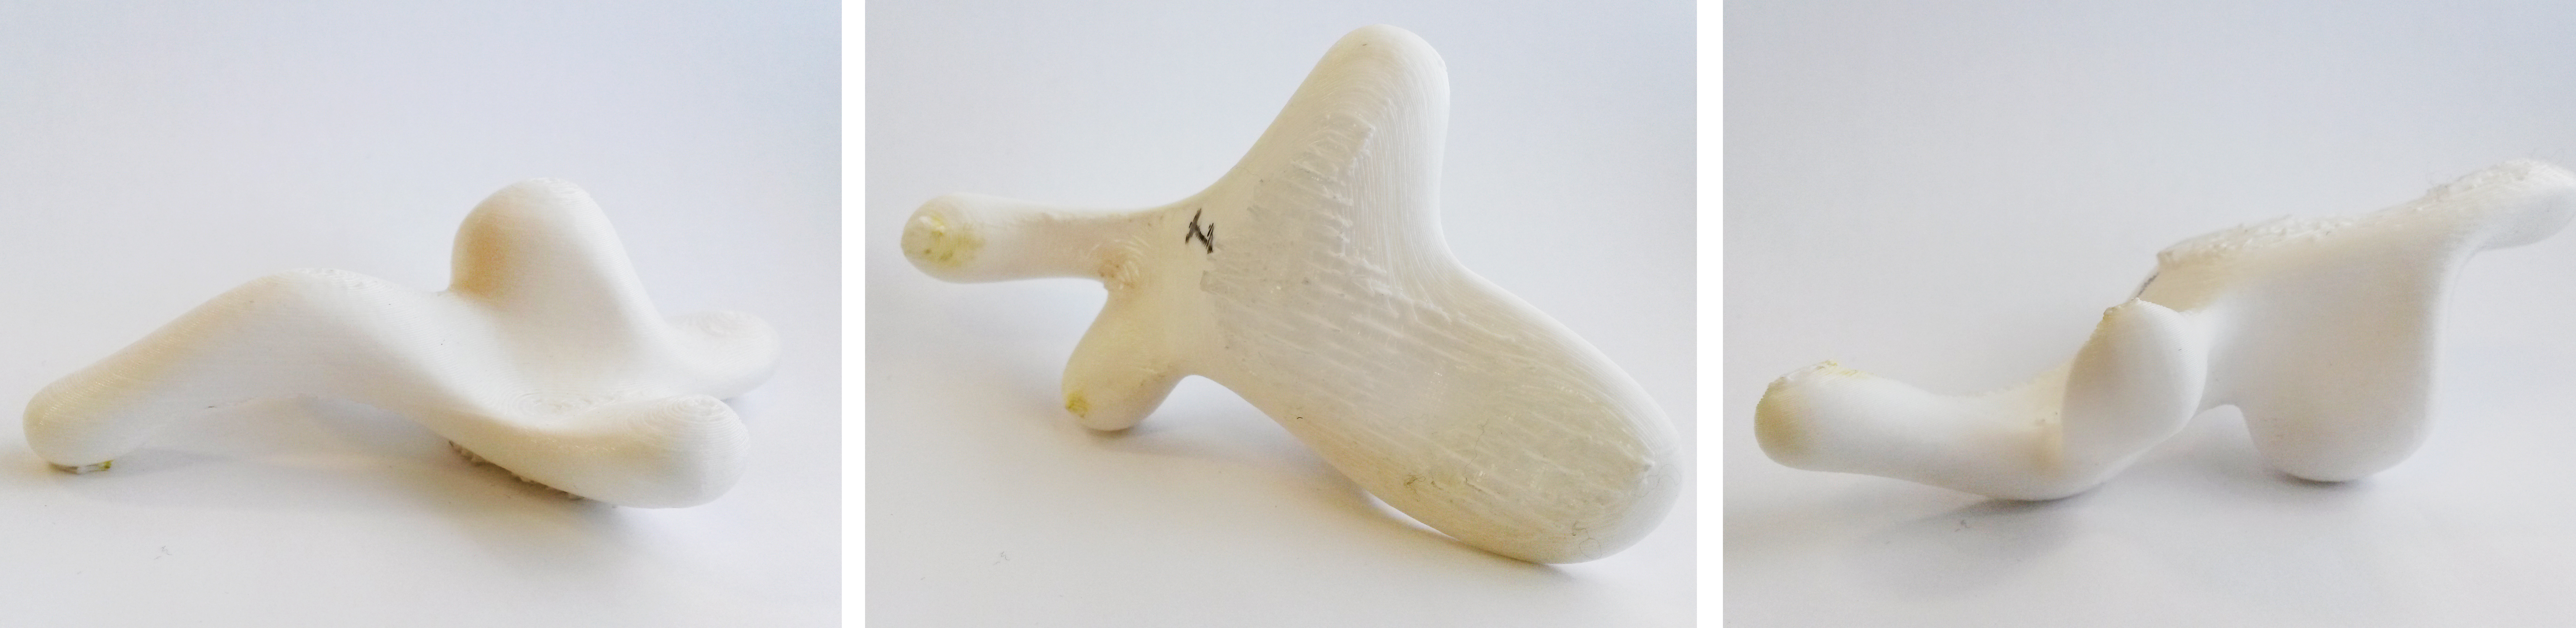
Form1Form2


Stage 2:

The two forms that followed took into account the problems that were present in the first set of forms. I attempted to make the curves flow more consistently while keeping a variety of surfaces present. Although one of the forms was successful in being simplified, the other one became too complex and is not such a strong variation on the previous ones. However, the main quality that these forms both followed through with was advancing on positioning options that are available. They were able to be flipped over multiple ways and were able to stand without falling over. This helped me realize that there do not have to be as many surfaces sticking outwards for it to hold its form; instead, I just have to take advantage of the few surfaces I do use and manipulate the angles and soft edges for it to be able to stand stably in different ways.

Form3

Form4


Stage 3:

This single form took on a manner of simplification. It is able to be placed in about five different positions, limits the amount of extended parts, is able to give a slight rocking motion for the child to work on their balance and stability, and its minimal design alludes to different forms that might be found in nature. I believe that the ambiguous design will enhance the final forms and I will be able to create a set of pieces that will work well together.

As stated before, I will be developing the exact curves and angles necessary to help the child with different activities, such as strengthening their core muscles and sitting upright. Figuring out a general form that is made up of all of the other features the final piece will encompass will be used as a basis later on as the development of the design progresses.

Form5

Although irrelevant to the actual function of the pieces, I really like that all of these forms allow the imagination to run wild, somewhat like a rorschach test. When other people saw these forms, they asked me if they were models of different sea creatures such as starfish, seals, whales, octopuses, and many more. These forms, although based on no apparent object or animal, will allow the children to advance on not only their physical development, but their creativity and imagination as well. It will enhance the “fun” element that I have been looking to incorporate since the beginning.

Material Consideration

I have known since the beginning that I want to use bright colors in my final design concept due to their positive effect they can have on children’s focus, as well as making a design for children more playful, especially when it comes to one that has more of a developmental focus. For example, PT told me in our last meeting that there are many developmental devices that require straps in order to hold children in a certain position. These childrens’ parents do not want to see their child “strapped down”, so bringing in bright colors can help eliminate that scary element for both parent and child.

When it comes to material consideration, I am still thinking about different options while focusing on both the manufacturing process and the requirements that this product will need to meet. I have been leaning towards the idea of using silicone for the end product, but having it be made from solid silicone will be incredibly heavy in both cost and physical weight. So why not take advantage of the abilities that silicone has to offer?

Idea #1:

The form will be hollow in certain areas, specifically at the “appendage” parts that stick out, and the silicone wall will be very thin at those points. The hollow spaces will be filled with either a gel or water, cut off internally from the rest of the piece so that it will not leak out. These softer areas can be used as head, leg, arm, or core support underneath the child as they play. The different densities will create different sensations for them while they lie down and play or practice working on developmental techniques such as “tummy time”. The center of the design will still be solid in order to keep the rigidity and support the rest of the parts.

Another possibility is to have these hollow regions filled with air, just like gertie balls that are commonly used during physical therapy sessions. There would be a way to adjust the amount of air that is inside, allowing different densities to be achieved depending on how much it is filled.

Idea #2:

The entire form will be hollow, consisting of an external wall of silicone and an internal space filled approximately halfway with sand. When the piece is rotated in different directions for different uses by the child, gravity will cause the sand to fall down in to the base, keeping it sturdier and allowing it to sit more firmly on to the ground. The child will be able to work on their motor skills by gently pushing the piece over and the sand will give in to this movement, helping enhance the shift that they are already causing to occur. They will be able to feel and slightly hear the weight shift as they slowly turn it over.

The additional element of sand has the ability to create a stronger support system for the piece as a whole, as well as enhance the overall sensory experiences that the child will engage in while playing.

OrganicDesignConcept2


I will continue to play around with different organic forms by making CAD models and using them to print small 3D form models for stability and rotational testing. I want the design to be able to function on more then one side, allowing for a greater variety of use by the child in each of the forms.

Advice to Move Forward With

Meeting with my Advisor: PT

PT gave me some really positive feedback once I explained my new design concept to her. She liked that I am taking a new direction and thinks that the forms have the potential to be successful while also being fun for the child. She has been really good at keeping my concepts on the more functional side while I throw in the creativity aspect to come up with functional forms that can make a difference in these children’ lives.

Her main advice was to narrow down the age range. Although I started my focus on newborns until three year olds, my design has the ability to be more productive if it has a more focused direction. For example, I have been trying to create a form that has the ability to give head support to a newborn learning to use his/her neck muscles while also being able to rock back and forth so a toddler can work on his/her leg muscles. I think I am trying to get too much usage out of an object that can be designed in a ‘supernormal’ way. In other words, I do not want it to have any unnecessary parts or be over-designed.

PT suggested that I stick with the age range of about 8 months to 14 months, the age in which they already have slight development, so that the design can focus on the advancements from that point forward. I am unsure if this is the age range that I will be sticking with but I am going to take her advice and look at the stages of development so that I could narrow it down.

The first thing that PT really liked about my concept was that I broke away from standard, geometric forms that are often used in her physical therapy sessions. The organic forms reminded her of a product that she sometimes uses with the children and she immediately went to grab it for me so I can look at it in person:

bilibo_organictoy

Bilibo, which is available at moluk.com, is a developmental tool used to increase gross motor skills and enhance creativity in children. It is such a simple form that it lends itself to endless possibilities in use depending on which direction it is placed and how the child chooses to interact with it. Although it is very different than the concept I am currently designing, it gave me confidence that a simple design has the same amount of opportunity as a more complex design, if not more so in some cases.

Looking at the form sketches, she thought that it was great that the child would be able to climb on and off the pieces to help with their motor development. When PT looked at my concept, she said she could envision a child using it that already has the ability to creep on hands and knees and is learning to crawl. She liked that I was trying to incorporate a slight rocking motion using the curved edges; that motion can help with balance, motor reactions, and visual development, specifically eye tracking. In addition, she suggested that if I create back support for a sitting position, the support should be upright, not leaning, in order to get the child’s main weight over his/her hips.

I mentioned the idea of using silicone as the final material. Choosing material for a product is extremely important, especially when it comes to a design for children. She agreed with me that it would make it a firm, sturdy structure while still managing to keep it rather soft and child-friendly. One piece of advice for me was that if I choose to use silicone in the end, I must make sure that it is hypo-allergenic. She also said that when designing the surface textures, I must make sure to not make the textures too fine. For example, although it is still made from silicone, adding a stringy texture on the surface would make it pretty hard to clean when the time comes. Especially since this product will require cleaning quite often due to the fact that it is designed for children and will be dealt with rather physically.

Pursuing A More ‘Organic’ Design Form

This new design approach aims to create more unique, purposeful forms that break away from the standard geometric shapes I have been focused on. In addition to the aspect of  appearing much more interesting and playful, I am also able to manipulate their forms to a greater extent so that they can carry out multiple functions at the same time. They will read more easily as a design for children, based on form as well as carefully chosen elements such as color and material, which intensifies the fun aspect that I have been trying to achieve.
OrganicDesignConcept1These sketches are just initial ideas for this new concept and will continue to be advanced upon as I proceed to define specific purposes for each one of the parts. I thought of tasks such as a requirement for added head support while lying down as well as under arm support when learning how to crawl. I want the forms to have zero completely flat edges to support them; instead, carefully chosen curves and protruding “appendages” will create a dynamic support system so that each one can be rotated into a number of positions for different purposes. They will be used throughout the initial developing stages, including the child learning to turn his/her head and learning to sit upright. Varying heights and densities can be targeted as a support system as the parent works with the child on developing physically.

When I was focusing on the geometric forms, I was conflicted right off the bat. I kept on imagining them being made from that standard gym mat material and could not break away from that mental image. However, when it comes to these new, curved forms, I am excited to experiment and see how the right material can enhance the design. I will be looking into using silicone as the material due to its range of densities, ability to be molded into different thicknesses, and safe quality that needs to be key when designing for children. Removing all of the edges has already led the way towards a safer design path, so why not utilize a material that can advance on it? Also, silicone will easily lend itself to being formed into different textures throughout the surface, such as a ribbed texture and a bumpy texture in different sizes.

This sketch shows the idea that I had of being able to rotate each piece in any direction while still keeping the functions that they need:

OrganicDesignConcept1a

For example, a curved U-shape on the floor can be used for surrounding support when learning to sit upright and a single part sticking outward on the floor can be used as under arm support when doing “tummy time.” The usable surfaces change depending on how the shape is positioned on the ground and a design aspect I will really focus on is how to keep it sturdy in every position.

I foresee limiting this design concept into about four separate parts, ones that work together to create a unit but can each be used as a stand-alone piece. They will subtly target different areas that need improvement and each one will be a necessary component to the overall design.

Meeting with my Advisor: Alex Lobos

I sat with Alex to explain to him how my initial tiled mat design has advanced to this newest concept idea. After going into the details of the new design, Alex told me that he really thinks that it would make the child’s tasks more reachable and in addition to that, it is a visually effective design that reads a lot more as a design for children.

He also helped me realize what I need to continue working on at this point in order to move forward. I have to narrow down exactly what the child needs to accomplish and to design shapes specifically targeted towards meeting those needs. For example, the act of pulling upright into a sitting position requires friction and softness at the base, something on the side to grab on to, and a large amount of stability in the right area. I will go through each important milestone and break them down to see how design can initiate a specific action or how it can help a child follow through with one they are working on at the moment. In addition, if a visual cue will influence the child to turn his/her head in a certain direction, a stimuli can be added for the child to be directed towards.

Alex agreed that one of the greatest limitations of the geometric forms was that they were all one note; it is difficult to ask them to do so many things at once. These new, edgeless forms are curvy, yet parts will extend outward outside of the focused mass in order to create a stable system that can support it in any position that it is in at the time.

Each form needs to work in such a way that it can be used in any direction, as though you can throw it and no matter which side it lands on, it works. These shapes, although seemingly random, will each carry out a specific underlying purpose, but will be able to work for much more than that.

Playing With Different Forms

I am going to branch out from the current concept design in order to play with different possibilities for my future design. Although I might end up advancing on the first concept, I feel it is best not to limit my options at this point.

Sticking with three-dimensional shapes, I will be pursuing a concept that combines multiple texture options in the same form so that the overall number of separate pieces can be reduced. They will be multi-functional forms that have multiple angle and height options so that they can be used for different purposes.

Concept Development Sketch

The geometric forms on the left can be opened up and re-arranged to create new forms, as seen on the right, from the same number of modules. There can be increased surface area, a larger variety of angles to lean on, and greater height differences. This new combination of different heights and angles can be used for different purposes depending on what physical advancements the parent and child are working on at the moment. Having the ability to advance from simpler forms to more complex ones, the geometric shapes can be used for all levels of development.

Meeting with my Advisor: Stan Rickel

20141030_155848

I sat with Stan, my thesis advisor, in order to gain some further insight into my most recent concept development. He advised me to break away from the standard, geometric forms that I have been inclined to using. In his opinion, these limited shapes are too common. Although I will continue to test out this concept using physical forms, Stan suggested that I try to find more irregular shapes to use, ones that can be used both individually and as a unit. Instead of creating forms out of the top of my head, Stan also said that it might be a good idea to look at already existing shapes in my surroundings and see how each of them could influence new forms for my design.

I have been drawn to using geometric forms since the beginning due to their straight edges and abilities to become modular. I did not consider using softer, more organic shapes because I could not see them being able to be used stably in different directions without having any flat edges to support them. In my mind, softer shapes were limited to completely rounded forms that had no ability to support and stabilize the child while they were being used. I did not consider that I could manipulate the forms to perform the exact functions that would be required, such as adding thicker parts to certain areas for greater support and creating curved edges so that they can be laid down and keep their stability while in use.

How can I create fun, curvy forms with no defined flat edges that can still be firmly positioned on the floor and can be used on all sides for different purposes? In addition, how can I manipulate various textures and densities with the use of specific forms and material choices?

20141030_173210

In order to begin this new exploration, I started to look at previously existing abstract forms that contain zero flat edges and rely on curved surfaces to enhance their shape. I took the time to look at all of the possibilities that can occur when they are turned over in multiple directions and when different amounts of weight are added to alternate sides. I will continue to experiment with these more natural forms so that I can tap into their potential for my design concept.

formdevelopment

Advancing on My Design Concept

Taking the advice from my three mentors, I took the time to break down my design concept even further. Here are the results:

Current Elements of Physical Model:

The overall model consists of contained space, shapes, forms, colors, textures, levels, heights, and removable parts. I am going to advance on this design by figuring out which ones are really necessary and which ones I can combine in order to simplify the overall design.

The ‘mat is an element of contained space, limiting the boundaries and adding material to the design that might be restricting the possibilities of use. It could be the main part to remove from the design, leaving the tiled pieces as the main focus.

The ‘three stages of tiles‘ consists of moveable parts and is the most important and impactful element of the design. However, having the three separate stages might be too much. It makes the design far too complicated, increases the amount of parts required, and is too defined at this stage of the design. I will continue focusing on this aspect in order to pull out the individual elements from each stage and then further break those down.

A Breakdown of the Three Stages:

Stage One – Consists of textures, two-dimensional flat pieces, hard and soft pieces, rearrangeable parts, elements of varying resistance, and an overall tactile focus.

Stage Two – Consists of textures, three-dimensional pieces, various angles, different heights, curves, edges, hard and soft pieces, and shapes.

Stage Three – Consists of three-dimensional pieces, removable parts, cause-and-effect factors, interacting parts, and an audial element.

Important Overall Elements:

Having gone through the lists above, I narrowed down all the elements into the four most crucial elements to continue developing.

1. Texture. Varying textures enhance the overall sensory experience. They allow varied levels of surface resistance and an eased transition into the surrounding environment once the child’s mobility is gained. Lastly, having their limbs be in contact with a number of different textures heightens their sense and awareness of their own bodies. The textured surfaces are stimulating for them.

2. Varying Resistance. This element has the possibility to make certain tasks harder or easier for the child, depending on what is needed at the time. Too much support and resistance does not allow the child to advance, while too little support and resistance does not help them when they need it.

3. 3D Elements. While the two-dimensional elements are helpful, they can be combined with the three-dimensional forms to have fewer elements with a greater purpose. The three-dimensional elements can be incredibly helpful throughout this entire development process. They can be used for basic purposes in the beginning and for more advanced, creative purposes as the child develops physically (and in effect, mentally as well).

4. Removable Parts. The parent and child can use this element together. In the beginning, the parent can rearrange the parts for the child and as the child develops physically, he/she can play a bigger role in the setup of the design. This allows the product to advance in stages along with the child. In a sense, they are growing and advancing together. Lastly, it further enhances the child’s  fine motor skills once the gross motor skills have been developed. The child is able to move the individual elements around on the floor and take them apart using their hands, depending on the future design of each piece and how detailed they will become.

Meeting With My Advisors

I met with all three of my thesis advisors this week so I could show them my model and hear their opinions.

My panel of thesis advisors is made up of two industrial designers and a pediatric physical therapist. I think that throughout the process this will benefit me in gaining a well-rounded perspective on my approach, allowing me to better understand the overall form and function required. Combining insights from both ends will make my end product a successful design.

Advisor: Stan Rickel

Stan broke down my play space design into three elements: the mat itself, objects, and more complicated objects. He realized that there is a process of going from two dimensional forms into three dimensional forms.

He told me that it reminded him of an obstacle course or a board game. There are individual moveable parts that can be assembled in different ways so that the child could interact with them. The child becomes part of the game.

The floor becomes anything they want it to be- aside from helping them physically, it is a great environment to allow them to be creative and use their imagination.

It integrates cause-and-effect, sensory integration, creativity, play, parent-child interaction, and physical therapy.

Advisor: PT

I explained my entire design to PT before she told me her thoughts. She mainly focused on stage two when she analyzed the potential of my design. Stage two is where the three dimensional forms are introduced, the “propping” stage.

20141002_164950

She told me that the wedge shapes are shapes that are used by physical therapists during their sessions. The angled shapes are used to help children with different levels of support and positioning. If they need to be propped at a certain angle to play, the parent can lean them on the shape with the correct angle.

For example, certain shapes can help the child ease into a quadruped position (on hands and knees). The form can bear some of the added weight to ease them into doing it on their own eventually. They are especially good for “tummy time”, a critical stage in the beginning of every child’s development.

She also suggested an additional factor in which cut-out shapes are added to each piece. The cut-outs can be used for more focused support on different parts of the body, such as places where they can put their arms inside while their stomach lies on the top surface or a spot where the child can sit down and be surrounded by material around them. If the holes had larger opening on the side, they can be used as a “crawl-through” piece. The interior space could be lined with a more distinct texture so that while the child crawls through it, they could reach up or around them to feel the lining.

PT also had some advice for the auditory element, the cause-and-effect part of the design that would serve as a reward in the end. She liked that I did not revolve this design around technological elements, although they do have their place in designs for children. She informed me that there are many cause-and-effect children’s products currently available that are very technology based. They can be useful at times but overall they create limited room for growth and creativity. Technology should be used within limit, as long as it does not interfere with the child’s ability to move beyond it. Also, when it comes to technology, the gratification is so immediate that there is not that much work done to get to that stage. Children do not have to try as hard and the end results are the same.

When looking at it from a different point of view, however, technology does have its place. When it comes to the technology in general in these types of products, children with extremely limited movement can easily work with technological products with ease and less effort. An example would be a capability switch that can be attached to electronic products so that they can be turned on and off with the slightest touch by children who struggle with motor skills.

Overall, PT said something that stuck with me. She said that “technology has overly infiltrated play.” I have thought the same thing since the beginning of my thesis project and am trying to find a way to design a product that is as helpful as possible to these children without having to rely on the abilities of technology.

Advisor: Alex Lobos

Alex gave me really helpful advice after I explained the concepts behind my design, which gave me some direction in how to move forward with it. I knew that I was trying to tackle too many aspects at once while attempting to keep the design simple; unfortunately, it did not turn out to be as simple as I had anticipated. He started off by telling me that it would help to define more purpose, or direction, to keep me from going off track. I also need to go through my research and figure out exactly which tasks I need to help my user with so that I can tackle more specified problems as opposed to trying to solve too many things at once.

When discussing all three stages of the design, Alex had me think about which one of the three was the most important. Which stage alone has the most potential to help these children? In the end, Stage 2 (the stage when the physical shapes are introduced and can be moved around to be used for many purposes) is seen as the one that can be most impacted by a designer. It is the point in the process where I will be able to have the most power helping them since it is when they are the most dependent on their environment. I can still combine the other two stages’ findings into the second stage, such as bringing in the textured surfaces from Stage 1 and incorporating the cause-and-effect element from Stage 3.

A break-down of his advice:

1. To take a step back and see what I have already designed, which I should then break down into important elements (i.e. surfaces, form, layout, and color).

2. To find the components that will help the most with reaching the final goal. Must break it down to the most potential surfaces (i.e. hard vs soft or textured vs smooth).

3. To define to what degree each part of the design is helpful with for each stage of the child’s physical advancement.

4. To pick a few milestones (i.e. reaching arms outward, lifting head, and crawling) and deconstruct them, then figure out design strategies for each one.

5. To figure out the most minimal amount of parts that can make the most impact. Must remove all potential failures – simplicity is key. 

Beginning to Toy with Physical Deliverables

I have continued to gain further insight about what can help children with abnormal muscle tone by continuing to read books about sensorimotor development and books that focus on why motor skills matter. All of my research, combined with what I have observed from watching PT work with different children, has taught me about the regular stages of physical development in a children compared to those who have hypotonia and hypertonia.

One big takeaway so far is the importance of engaging the senses during activity time. As I have mentioned before, different materials have different effects on the child, especially when used in the correct way. This insight triggered my first design concept, which combines the design ideas that I have previously mentioned.

Design Concept: Transitional Sensory Floor Mat/Play Space

A motor-skill enhancing play space that advances and keeps pace with the child’s development.

Design_Concept1BThis concept is geared towards newborns to 3 year olds with abnormal muscle tone, but it is a universal design that really any child can use and have fun playing with. It combines my end goals of advancing on physical therapy sessions at home, engaging the parent to play with their child, and making sure that the child has fun in the process. It also helps the child develop while learning different levels of motor skills and focuses on sensory integration.

The elements of this product would be a rectangular floor mat covered in velcro and three different stages of removable tiles. It is a modular piece that can be configured in many ways, making each time they use it exciting and new. It also allows the parent to be hands-on with the child, setting up a sort of “environment” that they can watch their child interact with, enabling the child to develop physically and creatively.

Design_Concept1D

First Stage:

It focuses on the child when they are highly immobile, working on advancements such as turning their head and lifting their arms outward. The tiles come in different surfaces that contrast each other: hard and soft, smooth and textured. The tiles can be placed however the child needs it to be at that moment, taking up different amounts of surface area. For instance, softer textures such as carpeting allow increased resistance as opposed to a smooth and hard materials that have no grip. Depending on the resistance necessary for the activity that they are working on at the moment, the parent can adjust it accordingly. There are also various textured surfaces that can be used when the child is lying down. Due to their lack of mobility, children with abnormal muscle tone do not have the opportunity to explore their environment and feel different things in their surroundings. So I thought that bringing these textures to them within reach would be helpful to integrate them into what they would otherwise be missing out on.

Design_Concept1C

Second Stage:

It focuses on the child when they are gaining some mobility, working on advancements such as rolling onto their side, sitting upright, lifting up into quadruped position (on hands and knees), and initial phases of crawling. The tiles used for this stage, developing from two-dimensional to three dimensional from the previous one, would incorporate different shaped, textured voluminous pieces that could be arranged by the parent to further advance on their child’s motor skills. Depending on what part of the body they are focusing on, the parent can adjust the shapes to either fit around their child or to give them different levels of support. They can be stacked and rearranged in different ways all over the mat and while the child slowly advances in their development, they will have a slightly easier time moving around it to use the different parts more independently. It will help them by giving them different amounts of support in different areas of their body, as well as allowing them to interact with the pieces of different shapes and sizes.

Third Stage:

It focuses on the child when they are have already gained more mobility, working on advancements such as creeping, crawling, and standing. There will be tiles with different parts coming up from the base, ones that can be arranged into a system that works on more focused motor skills. I imagine the parts interacting with one another to create different functions, such as having areas to grab on to, ones that a ball can be rolled through, and ones that have smaller parts to pull on. I invision it as a simplified version of the “Mouse Trap” board game I used to play as a child:Screen Shot 2014-10-07 at 11.59.03 AM

Different elements are combined to create a system that teaches cause-and-effect. The parent and child can combine them together and then the child can work his/her way around the mat trying different techniques. This stage is designed to enhance the skills that they have yet to focus on while having fun at the same time. Another addition I thought might be useful in this stage is to introduce an audial element. Children respond extremely well to different sounds, such as the voice of a parent or a favorite song. This could be used as a kind of reward when the child finishes one task. Once the task is complete, a trigger effect would cause a recording of the parent’s voice or a part of their favorite song to be played, giving them a larger sense of accomplishment. It will make them want to go through the process again so that this effect will be repeated.

While this concept is just an initial idea, I believe that it has the potential to be advanced upon to become a better, more focused design. I will be meeting with my advisors to show them my progress and to gain some further insight into how I can move forward with this design.

A Chance to Shadow in the Home Environment

I had the chance to shadow PT today as she worked with the two previous children in their home environment- both children come from the same household. It was great to be able to see them in their natural environment as they work with their physical therapist. As I watched their interaction and spoke to Janet, some key information stood out to me that might influence my future design.

Child A – 9 months old; low muscle tone

PT started out working with Child A on a carpeted floor. She explained to me that she starts off on carpet because it will cause resistance when he tries to move and she will then put him on the hardwood floor to help him turn on his own more easily. He begins lying down on his back with his arms reaching above him. PT holds out two small plastic toys that he is able to grab from her and bang together; this simple act shows the improvement that has occurred over the past few months thanks to the physical therapy sessions.

When the physical therapist turns him on to his stomach, he still struggles to hold his head up on his own but is making slow progress. He also has trouble lifting his body into a sitting position, so she will put him in a hands and knees position (think of when you’re leaning on all fours) and slowly shift him into a sitting position from there. One fun thing that she does is place a mirror in front of him when he is finally sitting up. It completely grabs his attention and he is so distracted that he can sit up on his own, even if just for a little bit.

One drawback to the hardwood floor is that even though it is easier for him to move himself, the hard surface will cause him to hit his head harder if he gets more tired and his head drops downward. Also, he can flip onto his side more easily but the slippery surface makes it extremely difficult for him to transition from that position onto his stomach.

Child B – 2 years old; high muscle tone

PT proceeds to work with Child B using a device that she brought with her. She sets him up in a suspension walker, a physical therapy device used to aid children who have struggles walking on their own:

suspension walker

The walker holds him in place with a detachable harness and holds him up from above, but it gives him a little freedom to use his own leg strength to stand and walk. He is very hesitant to walk forward so the physical therapist stands in front of him with an object, such as a toy or an iPad playing a song that he loves, to coerce him to move forward. He takes a few steps in her direction but quickly gets frustrated and starts crying. It does help him with his strength but he is clearly not enjoying it at all.

I asked PT if his crying was caused by pain. She told me that even though he is visibly struggling, it is most likely not due to pain caused by the act of walking. It is just that he is not used to doing these sort of movements so it is uncomfortable and even scares him a little bit each time he progresses.

After giving him a little break to calm down, PT sits on the floor with Child B so that they are facing each other with their legs open and their feet touching. They hold hands and she slowly moves back and forth, pulling him towards her and then slowly letting him lean back. All of this is happening while she is singing a song that he loves so he is not as much paying attention to the act of moving as he is to the singing. She uses this technique as they go through different activities, either singing a song that he likes or making a song on the spot about the action they are doing at that very moment. Her voice seems to be calming him, causing him to have a momentary distraction from what they are working on.

_______________

Since this shadowing session was a home visit, it gave me the chance to speak to one of the child’s mother while I was there. She has been really supportive in my design pursuit since my last visit and it has been helpful to be able to bounce ideas off of a parent of children with abnormal muscle tone. When I explained my overall thesis goals to her, she agreed that if I could find a way to enhance their motor skills, keep them engaged, make it more meaningful for her, and make it fun for them then that would be an extremely impactful in-home design.

This visit gave me inspiration for a few general design elements that I might incorporate into my design:

Design Idea #1

A device that can alter the amount of resistance the child needs to exert in order to cause something to happen. One that can take more force and pressure in the beginning and gets progressively easier as the child plays and gets tired, but it can also start off easy to use and get harder as the child plays in order to build endurance.

It can be gone about mechanically using mechanisms or adjustable parts, or I can use some sort of material that naturally possesses the quality of tension and resistance, such as water, air pressure, or sand. Maybe these can be used inside of the product to create a cause an effect that will engage the child in different ways.

Design Idea #2

A voice-recording element in which the parent can sing while playing with their child and having fun, but it can be recorded for them later and be replayed when the child is playing on their own. Perhaps an order of actions that have to be done, such as pulling a lever or pushing a ball through a hole, that is then rewarded with a recording of their parent singing the song that they love. Knowing it is something that will happen once the actions are completed can be persuasive.

Design Idea #3

A transitional material for a floor mat or play space. Material and textures are important sensory triggers that can be manipulated and used during certain actions to provoke specific outcomes. Smooth and hard textures or soft and bumpy texture surfaces might be able to be combined in some way. Maybe even removable pieces, such as those individual bath mat pieces for children that cause traction, can be used on a smooth surface so that there are multiple options.

The opportunities are endless.

Basics of High Tone and Low Tone

Some more information that the physical therapist told me while shadowing:

Tone is defined as tension of the muscles at rest. Low tone is when the child’s muscles feel soft and doughy, while high tone is when the child’s muscles are more rigid and stiff due to higher tension. On both ends, range of motion is a big concern. Both types make it hard for the child to move against gravity.

A really big problem that physical therapists have to counter-act is what is known as the ‘W-Sitting’ position:

Screen Shot 2014-09-11 at 2.15.19 PM

W-sitting is an easy position to sit in for a child with abnormal muscle tone since it increases the area of support outward due to the ankles and feet being on either side. It takes significantly less effort than sitting in other positions since it shifts the weight onto the pelvis area and outright feet instead of on the child’s bottom. It is not good for the child’s hip and knee areas since it puts a lot of pressure on them in the wrong direction. It also does not promote weight shifting, good pelvic strengthening, and movement in and out of sitting.

I will continue to shadow therapy sessions to learn more techniques from the physical and occupational therapists that can help me with my design.